All blogs
Mobile App Development
5 Steps to Integrate Automation Testing in Projects
Start with stable, high-risk mobile flows, pick fit tools, add smoke tests to CI, keep PR runs under 15 minutes, and scale selectively.
12 min read

5 Steps to Integrate Automation Testing in Projects
If you still test every mobile release by hand, you will hit a limit fast. I’d sum up this guide like this: start with stable, high-risk flows, pick tools that fit your app, plug a small test set into CI/CD, keep runs under 15 minutes for pull requests, and grow only where the work pays off.
Here’s the short version in plain English:
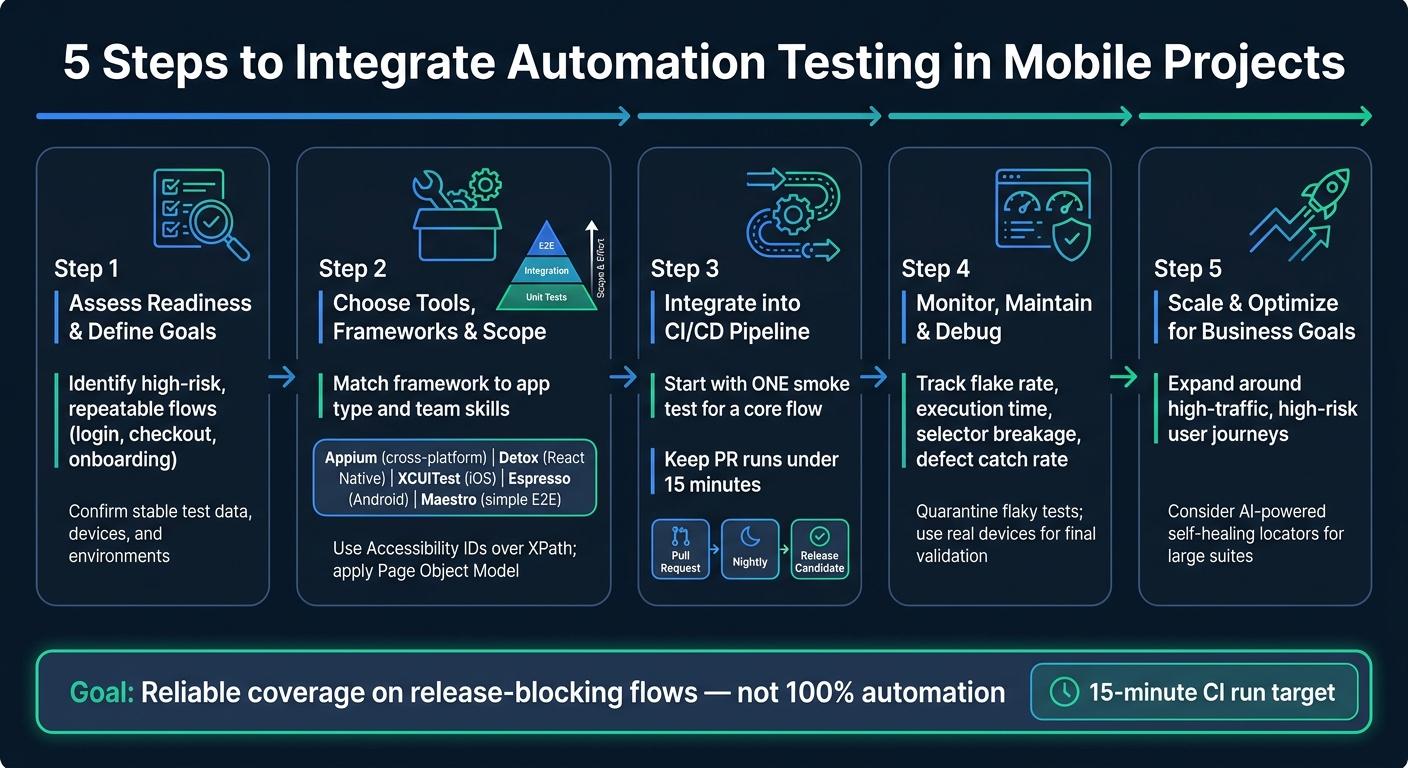
- Step 1: I check whether the project is ready for automation at all.
- Step 2: I choose test cases and tools based on app type, team skills, and upkeep.
- Step 3: I add a small smoke suite to CI/CD first, not everything at once.
- Step 4: I watch for flaky tests, failed runs, and weak selectors.
- Step 5: I scale around business risk, user traffic, and team time.
A few points stand out:
- Mobile QA gets harder because of device models, OS versions, permissions, and network issues.
- Automation helps most with repeatable regression checks like login, checkout, onboarding, and account recovery.
- Manual testing still matters for flows that are new, changing, or need human judgment.
- Most coverage should sit in unit and integration tests, while E2E tests stay focused on top user paths.
- Stable selectors like Accessibility IDs are safer than XPath.
- Teams should track things like flake rate, execution time, defect catch rate, and selector breakage.
Here’s a quick comparison of what each step is doing:
| Step | Main focus | What I’d do first |
|---|---|---|
| 1 | Readiness and goals | Review manual regression pain points |
| 2 | Tools and scope | Pick stable, high-value test cases |
| 3 | CI/CD setup | Add one smoke test for a core flow |
| 4 | Test upkeep | Log failures, quarantine flaky tests |
| 5 | Growth and tuning | Expand around high-traffic, high-risk flows |
The core idea is simple: I would not aim for 100% automation. I’d aim for reliable coverage on the flows that can block releases, hurt revenue, or lock users out.
Building Automated Testing into CI Pipelines: Quality, Speed & Confidence | Uplatz
sbb-itb-622dc24
Step 1: Assess Project Readiness and Define Testing Goals
Before diving into automation, make sure your test data, target devices, OS versions, and environments are stable. Skipping this step can lead to a fragile and high-maintenance test suite. Use this phase to decide what should be included in your first automation sprint.
Review Your Current Testing Process
If your regression testing relies heavily on manual work, start by automating the highest-risk workflows. Focus on repeatable processes with well-defined and predictable outcomes - such as sign-in, checkout, or account recovery. For workflows that are still evolving, it’s better to handle them manually until requirements stabilize.
Additionally, confirm that your test data and environments are reliable. This includes ensuring consistency across device models, OS versions, permissions, and network conditions. Unreliable inputs can lead to inconsistent and misleading results.
Set Clear Automation Goals
Align your automation goals with critical workflows like sign-in, onboarding, purchases, permissions, and account recovery. Define release gates early so the team understands which failures will block a release. It’s also important to set expectations for flake rates and establish how quickly broken tests can be diagnosed and fixed to maintain reliability.
For each identified risk, map out a clear decision on whether it should be automated or kept manual before expanding the scope.
| Risk Category | Automate This | Keep Manual |
|---|---|---|
| Revenue/Conversion | Stable checkout or booking flows | New pricing models or changing UX |
| Access/Identity | Login, MFA, and session expiry with reliable data | New account flows requiring judgment on copy or trust cues |
| OS Permissions | Camera, location, and biometrics across OS versions | First-time prompts and UX wording evaluations |
| Operational Handoff | Backend record creation and admin updates | Flows with business rules still under negotiation |
These priorities will guide the scope of your initial tests, as well as the tools and frameworks you’ll need to implement them. Once the key workflows are defined, you can select the tools that best match those needs.
Step 2: Choose the Right Tools, Frameworks, and Scope
Once you've pinpointed your high-priority workflows, it’s time to decide which tests to automate first and identify the best framework to support them.
Identify Which Test Cases to Automate
Focus on automating stable, high-value workflows with predictable outcomes. For flows that are still evolving or unstable, stick with manual testing until they stabilize.
A helpful guide here is the testing pyramid. Allocate most of your coverage to unit and integration tests, leaving end-to-end (E2E) tests for only the most critical user journeys. This approach keeps your test suite efficient in terms of speed and cost.
Once you've narrowed the scope, align each test layer with the most suitable framework.
Select Automation Tools and Frameworks
When choosing tools, consider your app's architecture, your team’s skill set, and the ongoing cost of maintaining the tests.
Here’s a quick comparison to help you decide:
| Framework | Platform | Language | Best for | Speed |
|---|---|---|---|---|
| Appium | iOS + Android | Java, Python, TypeScript, C#, Ruby | Cross-platform, hybrid apps | Moderate |
| Detox | iOS + Android | JS / TypeScript | React Native apps | Fast |
| XCUITest | iOS only | Swift / Objective-C | Native iOS apps | Very Fast |
| Espresso | Android only | Kotlin / Java | Native Android apps | Very Fast |
| Maestro | iOS + Android | YAML (Declarative) | Simple, low-maintenance E2E | Fast |
For better long-term results, prioritize using Accessibility IDs for element selection instead of XPath. Accessibility IDs are faster, more reliable when UI changes occur, and work consistently across both iOS and Android platforms. Combine this with a Page Object Model (POM) structure, where platform-specific locators are kept separate from shared test logic. This structure makes your test suite easier to maintain as your app evolves.
Once you've chosen your tools and frameworks, integrate the first set of tests into your pipeline to get things rolling.
Step 3: Integrate Automation Testing into CI/CD Pipelines
Once you've selected your tools, the next step is to connect your initial tests to the CI/CD pipeline. This ensures that every build undergoes automatic testing. Begin with a single smoke test that validates the most critical user flow.
Start with a Small Set of Critical Tests
Begin by adding one essential smoke test, such as validating the login or checkout process, and integrate it into your pipeline. Focus on critical functions like sign-in, purchases, and account recovery. Keep these smoke tests concise - aim for under 15 minutes - so developers can rely on and effectively use the results.
After stabilizing this initial test, expand your coverage gradually. Prioritize a steady cadence for adding tests rather than overwhelming the pipeline with a large volume all at once.
Use a Layered Testing Approach
Once your first smoke test is running smoothly, introduce additional layers of testing. Each type of test should align with the pipeline stage where it adds the most value.
| CI Cadence | Test Types | Purpose |
|---|---|---|
| Pull Request | Unit tests, API checks, fast smoke tests | Provides quick feedback during code reviews |
| Nightly | Broader regression, selected device matrix | Detects issues early before release-candidate tests |
| Release Candidate | Full E2E regression on target OS/device matrix | Serves as the final checkpoint for stakeholders |
This approach keeps pull-request checks quick while delegating more extensive regression tests to scheduled runs.
Manage Test Environments Consistently
For reliable results, ensure each testing stage runs in an isolated environment. This minimizes the risk of false failures caused by environmental issues. Use automation flags like noReset: false to reset the app state at the start of every session. When running tests in parallel, assign unique system ports for each session - use appium:systemPort for Android and appium:wdaLocalPort for iOS - to avoid conflicts.
Cloud-based device farms are a great option for accessing a wide range of real devices without the burden of maintaining physical hardware. Additionally, configure your pipeline to automatically capture logs, screenshots, and videos for every test failure. This makes it easier to trace and resolve issues quickly.
Step 4: Run, Monitor, and Maintain Automated Tests
Once your tests are integrated into CI, the focus shifts to ensuring they run quickly, remain stable, and are easy to debug.
Best Practices for Running Tests
After integration, the key priorities are speed and reliability. Aim to keep CI runs for pull requests under 15 minutes. To maintain test coverage without slowing down the process, parallelize tests across multiple devices.
For final validation, use real devices. While simulators are suitable for smoke tests, they can't replicate OEM customizations, variations in screen density, or hardware features like biometrics and NFC. Tools like Charles Proxy or macOS Network Link Conditioner can simulate network conditions such as 2G, 3G, or even airplane mode to better reflect real-world scenarios.
Flaky tests can undermine trust in your CI process. Monitor the flake rate as a metric of release quality. If a test becomes unreliable, quarantine it to prevent it from blocking releases. Assign someone to fix it and set a clear deadline.
Track and Report Test Results
Speed is important, but it's equally critical that failures are easy to diagnose. A simple "green" or "red" status isn't enough. Every failure should include key device details like the OS version and device model.
To avoid confusion during releases, clearly define your release gates. This ensures there's no ambiguity when a build fails:
| Gate Signal | Blocks Release When | Warns When |
|---|---|---|
| PR Smoke | Install, launch, or primary navigation fails | Non-critical smoke check is flaky with a linked issue |
| Nightly Regression | High-risk flow (e.g., payment or data sync) fails repeatedly | Medium-risk journey fails on one device class |
| Device Matrix | Target OS or top-audience device can't complete a critical journey | Low-traffic device has a visual or performance concern |
When a test fails, categorize the issue - whether it's app-related, data-related, an environmental problem, or a script issue - so you can address it effectively.
Keep Test Suites Updated
Maintaining test suites is an ongoing effort and is essential for ensuring quality. Neglecting maintenance can lead to brittle tests that slow down releases and increase QA costs.
One common cause of failures is selector dependency, where tests rely on fragile XPath expressions or IDs that change during UI updates. To avoid this, use stable accessibility IDs or dedicated test IDs whenever possible. This way, if the UI changes, only the affected module breaks rather than the entire suite.
Break tests into smaller, independent flows, such as login or search, to limit the impact of updates. Regularly review your device matrix and base it on actual user analytics rather than just the latest devices. Use these insights to decide which tests to expand, remove, or automate further. Small, consistent updates keep your suite efficient and effective.
Step 5: Scale and Optimize Automation to Meet Business Goals
Once your automation setup is stable and running smoothly, the next step is figuring out how to make it bigger without turning maintenance into a headache. Scaling effectively means being thoughtful about what parts to automate, how to measure success, and where AI tools can step in to ease the load.
Focus on High-Impact Features and User Journeys
Start by prioritizing the parts of your system that directly affect revenue, user access, or trust - like checkout processes, login systems, and account recovery. These are the areas users notice the most if something goes wrong.
For features that undergo frequent changes (like updates every sprint), stick to manual exploratory testing until things stabilize. Manual regression testing can help uncover risks when full automation of these flows isn’t feasible.
Expand your automation efforts where user activity is highest. Use this data to determine which metrics - like user engagement or error rates - should get the most attention.
Measure and Refine Automation Performance
Scaling without proper tracking is like flying blind. Keep an eye on key metrics like the defect detection rate, execution time, manual effort saved, and the selector breakage rate (how often UI changes cause test failures). For continuous integration (CI) feedback loops, aim to keep test execution time under 15 minutes.
If fixing selectors (caused by UI changes) takes up too much of your team’s time, it’s a sign your test suite might be too fragile. If maintenance demands grow faster than your coverage, it’s time to consider smarter tools, like AI-assisted solutions.
Consider AI-Powered Testing Tools
As your test suite grows, maintenance often becomes the biggest challenge. AI-driven tools can help reduce this burden by offering features like natural-language test steps, visual validations, and self-healing locators.
Teams that have adopted these AI-enhanced approaches - especially those designed to be user-friendly for non-engineers - have seen quicker testing cycles and better support from leadership. These tools can make scaling automation a lot more manageable.
Conclusion: Key Takeaways for Integrating Automation Testing
Automation works best when you treat it like a process, not a side task. First, assess readiness. Then pick the right tools, connect tests to CI/CD, and scale based on what the results show. That’s what turns automation from a side project into a steady part of how teams ship software.
Start with core user flows. Keep critical CI/CD runs under 15 minutes. And treat maintenance like engineering work, because that’s exactly what it is.
The goal isn’t full automation. The goal is reliable coverage for the flows that matter most, so releases can move ahead with confidence.
FAQs
How do I know if my project is ready for test automation?
Your project is ready for test automation when you’ve pinned down critical user flows that need steady, repeatable testing, have a stable test environment, and can automate test cases that are clear and dependable.
It also helps to be ready for the upkeep that comes with automation. Test scripts need updates as the app changes, and they work best when they’re part of your CI/CD pipeline so testing happens continuously.
Which mobile app tests should I automate first?
Start with tests you can run again and again, without surprises. Focus on the ones tied to core product behavior and clear pass/fail outcomes.
That usually means smoke tests first, along with stable, high-impact flows such as login, onboarding, account recovery, checkout, and navigation.
From there, move into regression tests for common user journeys. The goal is simple: cover the paths people use most and the ones the business depends on day to day.
Hold off on automating brittle visual checks or edge cases too soon. Early on, it’s better to put time into the areas that have the biggest effect on user experience and business operations.
How can I reduce flaky automated tests?
Reduce flaky automated tests by making them more stable and dependable.
Use stable accessibility IDs or test IDs so selectors don’t break every time the UI shifts a little. Add explicit waits based on actual app states, not arbitrary sleep timers. That means waiting for a screen, element, or API-driven state that shows the app is ready.
Test data matters too. Keep it isolated, reset app state between runs, and avoid shared user accounts when tests run in parallel. Shared accounts are a common source of random failures because one test can quietly change the state for another.
When a test keeps failing off and on, quarantine it. But don’t just toss it aside and move on. Give it a clear owner and an expiry date so it gets fixed instead of forgotten.
It also helps to track flake rates over time. If a test fails 2 out of 20 runs, that tells a very different story than a test that fails 15 out of 20. Once you can measure the pattern, it’s much easier to spot what needs attention.
For faster root-cause diagnosis, capture:
- Logs
- Screenshots
- Device details
Those artifacts can save hours of guesswork, especially when the failure only shows up on one device, one OS version, or under one timing condition.
More from the studio