All blogs
Mobile App Development
How to Build a WebRTC Streaming App: Step-by-Step
Step-by-step guide to building low-latency WebRTC apps: choose P2P or SFU, implement signaling, STUN/TURN, auth, and failure testing.
7 min read

How to Build a WebRTC Streaming App: Step-by-Step
If you want a WebRTC streaming app that people can actually use, I’d focus on four things first: media flow, signaling, NAT traversal, and failure testing. In most cases, a basic 1:1 MVP takes 4–8 weeks, while a more polished product with mobile, backend work, and multi-user support can take 3–6 months.
Here’s the short version:
- I’d use WebRTC when low-latency audio/video matters
- I’d start with P2P for 1:1 calls and move to an SFU for group sessions
- I’d build around client app + signaling server + STUN/TURN + optional SFU
- I’d get camera, mic, SDP, and ICE working before adding extra product features
- I’d plan for auth, reconnects, permissions, recording, and monitoring early
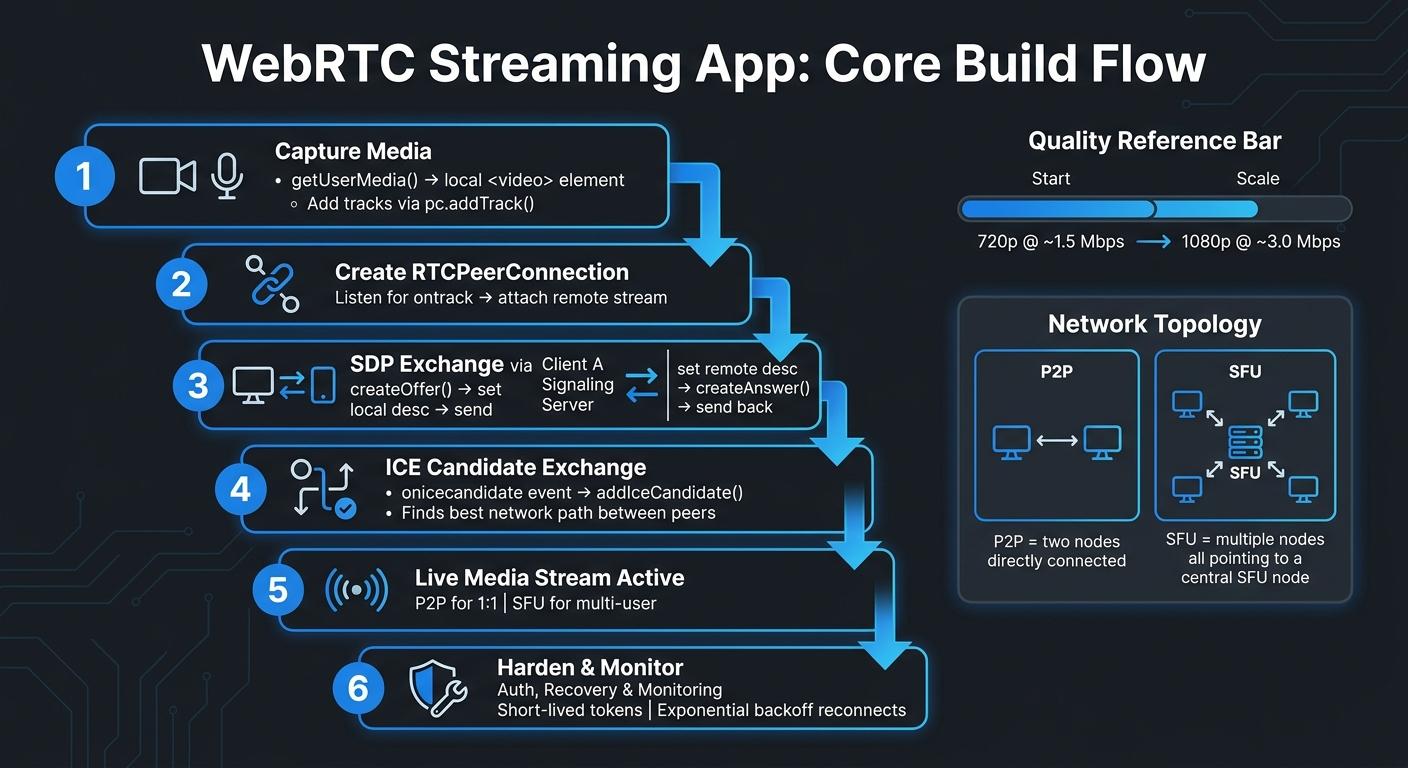
- I’d start video quality around 720p at ~1.5 Mbps, then move to 1080p at ~3.0 Mbps only when the network can support it
- I’d test join failures, blocked permissions, and dropped connections before launch
This article explains the path in plain terms: pick the network model, get peers connected, lock down access, improve call quality, and deploy signaling, TURN, and SFU services with repeatable release steps.
In other words: I wouldn’t treat a WebRTC app like a standard web app, because a few hundred milliseconds can change the whole user experience.
Build a Video Call App in 2024 (WebRTC Course with Golang) | Streamify | Part 2
sbb-itb-622dc24
Plan the Architecture Before You Write Code
Once you’ve mapped the core pieces, pick the network model before you build the client. Decide how media will move before any coding starts. After that architecture is set, you can move into media capture and signaling.
Choose Between Peer-to-Peer and SFU
For a one-on-one call, peer-to-peer (P2P) is the simplest path.
Use an SFU for one-to-many live streaming or any session with multiple participants. In that setup, each participant uploads one stream to the SFU. The SFU then forwards the right streams to the right people, which helps keep latency low and makes scaling easier to plan.
If your MVP is a simple 1:1 video feature, start with P2P. You can add an SFU later as your viewer count grows and your product needs change.
Define the Backend and Network Stack
Define signaling first. It handles connection metadata, not media.
Plan STUN and TURN early so you can deal with NAT traversal and restricted networks. Before writing client code, also lock in:
- authentication
- room state
- recording
- monitoring
That way, you’re not trying to bolt on core backend pieces later.
When to Bring in a Development Partner
Shipping across iOS, Android, and web multiplies architecture decisions. That includes picking the right platform-specific WebRTC integration and planning for long-term maintenance.
AI voice features add another layer, with token handling, interruption logic, and reconnect flows across platforms. For cross-platform WebRTC builds on iOS, Android, and web, Appeneure can support implementation, AI voice features, and UI/UX design.
That groundwork sets you up to build the peer connection and media flow next.
Build the Core WebRTC Streaming Flow Step by Step
Once you’ve picked your architecture, start with the media path. Get audio and video moving first. Then wire up signaling. After that, tighten things up for production.
Capture Media and Create the Peer Connection
Use getUserMedia to grab the camera and microphone:
const stream = await navigator.mediaDevices.getUserMedia({
  video: true,
  audio: true
});
Show that stream in a local <video> element so users can see what they’re sending. Then create an RTCPeerConnection and add each media track with pc.addTrack(track, stream).
For the incoming feed, listen for the ontrack event and attach the remote stream to a second video element. At this stage, the goal is simple: make sure local and remote media both render the way you expect.
Once that works, move to signaling so both peers can exchange session data.
Set Up Signaling, SDP Exchange, and ICE Candidates
Signaling handles SDP offers, answers, and ICE candidates. Use unique room IDs so participants can join the room.
- Client A joins a room and creates an SDP offer with pc.createOffer(). It sets that offer as the local description, then sends it through the signaling server.
- Client B receives the offer, sets it as the remote description, creates an answer, sets the answer as the local description, and sends the answer back.
- Both sides exchange ICE candidates as they’re found through the onicecandidate event, adding each one with pc.addIceCandidate().
This back-and-forth is the heart of the connection. One side says, “Here’s how I can talk.” The other side replies, “Here’s how I can talk too.” ICE candidates then help both peers find the best network path between them.
Add backoff-based reconnect logic so sessions can recover after network drops. That way, a brief disconnect doesn’t force users to start over from scratch.
After the first end-to-end connection works, focus on auth and session recovery for production use.
Harden Authentication and Recovery
Keep secrets off the client and use short-lived tokens for authentication.
Improve Quality, Security, and User Experience
After the first end-to-end connection works, shift your attention to stability, security, and user control. Getting a demo to run is one thing. Making it hold up on actual phones, spotty Wi-Fi, and production systems is a different job.
Manage Resolution, Bitrate, and Network Changes
Start with 720p at about 1.5 Mbps for mobile and web. Move up to 1080p at about 3.0 Mbps only when users have strong bandwidth and devices that can handle the extra load. Higher resolution sounds great on paper, but every jump adds more latency risk, more pressure on the device, and more egress cost on your side. Bitrate isn't just a quality dial. It's a tradeoff.
For reconnects during network handoffs and weak signals, use exponential backoff. That helps avoid hammering the network when the connection is already unstable.
After media quality is steady, tighten access and device permissions.
Handle Permissions, Privacy, and Encryption
Ask for camera and microphone access before the user joins the session. A dedicated pre-meeting setup screen, where people can test audio and video, helps stop permission prompts from popping up in the middle of a live call.
On the security side, WebRTC encrypts audio and video in transit with DTLS-SRTP by default. Use ephemeral tokens for session access, and keep long-lived keys off the client.
Hosts should also get clear controls for:
- Ending sessions
- Recording
- Screen sharing
With quality and security in place, the next step is testing failure cases and deploying signaling, TURN, and SFU infrastructure.
Test, Deploy, and Scale the App
Test Connections and Debug Failures
After the core flow works, stress-test the failure paths before release. That’s where a lot of teams get burned. A happy-path demo can look fine, then fall apart the moment a device blocks mic access or a connection drops mid-join.
Use structured error codes in your signaling layer so you can spot connection failures fast. Instead of guessing whether the issue came from signaling, ICE, TURN, or device permissions, you’ll have a much clearer trail to follow.
Test the first-join flow on real devices, not just desktops in a dev setup. You want to check:
- camera access
- microphone access
- permission prompts
- join behavior on first launch
Once failure handling is stable, carry that same discipline into deployment automation.
Deploy Signaling, TURN, and SFU Infrastructure
Deploy signaling, TURN, and SFU services through CI/CD, and keep secrets outside the codebase.
That gives you a repeatable way to ship changes without turning each release into a manual checklist. It also cuts the odds of config drift between environments, which is one of those problems that seems small until it eats half a day.
Conclusion: The Fastest Path to a Stable WebRTC Streaming App
The fastest path to a stable WebRTC app is simple: test failure paths early, deploy media infrastructure through repeatable automation, and keep releases disciplined as usage grows.
FAQs
How do I know when to switch from P2P to an SFU?
Consider switching from P2P to an SFU once your app needs to handle more than a small group.
P2P is a good fit for simple one-on-one calls. But there’s a catch: each client has to send its stream to every other participant. That can ramp up bandwidth use and put extra strain on the CPU fast.
An SFU changes that setup. Each client uploads its stream one time, and the server sends it out to the rest of the group. The result is better performance and smoother scaling for larger group sessions.
Why do some users still need TURN servers to connect?
Some users need TURN servers when a direct peer-to-peer connection just isn’t possible. That usually happens when restrictive firewalls, symmetric NATs, or more complex network setups block traffic between devices.
In those cases, the TURN server steps in and relays the media streams between users, so the connection can still work even when the network gets in the way.
What should I test before launching a WebRTC app?
Before you launch your WebRTC streaming app, test it for reliability and performance on different devices and operating systems. Check that the core features work as expected, the app responds well, and the overall user experience feels smooth.
You should also run security testing to spot vulnerabilities. After that, do beta testing with a small group of users so you can collect feedback from actual use in day-to-day conditions.
More from the studio